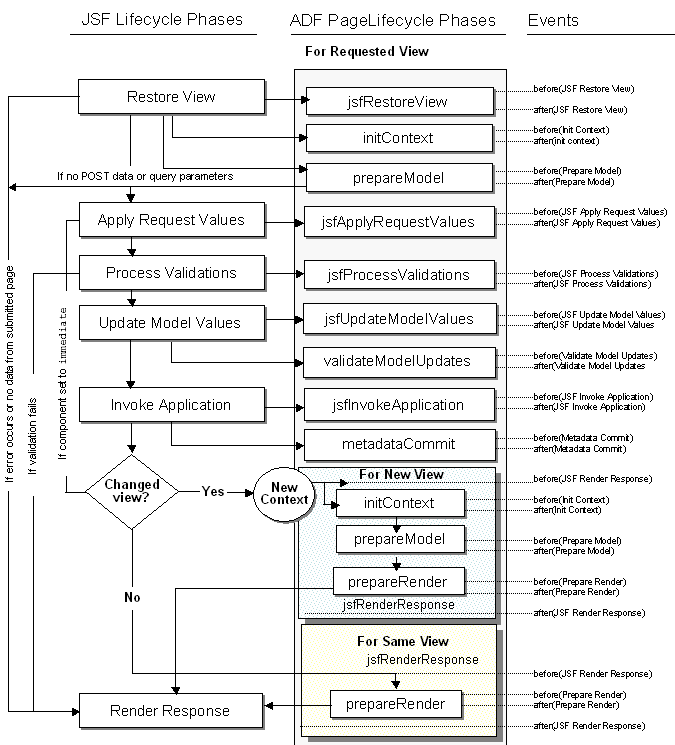
ADF Life Cycle:

On First Page Call
1. Restore view.
As the session is fresh, there's no means of any UIViewRoot to restore, so nothing to see here.
2. Apply request values.
This phase is skipped because there is no form submit.
3. Process validations.
This phase is skipped because there is no form submit.
4. Update model values.
This phase is skipped because there is no form submit.
5. Invoke application.
This phase is skipped because there is no form submit.
6. Render response.
The bean is constructed. Behind the scenes a new UIViewRoot is created and stored in the session. If the component binding getters returns precreated components (precreated in e.g. the constructor) and not null, then those will be used, otherwise JSF will create new components. The components will be stored in the UIViewRoot and the bounded components are set in the component bindings. The values to be shown are retrieved from the value binding getters in the backing bean. If the values aren't set yet, they defaults to null. The component bindings are not required by the way. Only use them if you actually need the component in the backing bean for other means than getting/setting the value. In this article they are included just to demonstrate what all happens in the lifecycle.
On Page Submit Action:
1. Restore view.
The bean is constructed. The UIViewRoot is restored from session and the bounded components are set in the component bindings.
2. Apply request values.
Nothing to see here. Behind the scenes the submitted form values are obtained as request parameters and set in the relevant components in the UIViewRoot, for example inputComponent.setSubmittedValue("test").
3. Process validations.
The submitted values are passed through the converter getAsObject() method and validated by the validator. If the conversion and validation succeeds, then the initial input value will be retrieved from the value binding getter and behind the scenes the inputComponent.setValue(submittedValue) and inputComponent.setSubmittedValue(null) will be executed. If the retrieved initial input value differs from the submitted value, then the valueChangeListener method will be invoked.
4. Update model values.
The converted and validated values will now be set in the value binding setters of the backing bean. E.g. myBean.setInputValue(inputComponent.getValue()).
5. Invoke application.
The real processing of the form submission happens here.
6. Render response.
The values to be shown are retrieved from the value binding getters in the backing bean. If a converter is definied, then the value will be passed through the converter getAsString() method and the result will be shown in the form.
Source: http://balusc.blogspot.in/2006/09/debug-jsf-lifecycle.html
